

If you have installed any of the applications developed by Microsoft on your computer, then you will find the Microsoft AutoUpdate app on your device. The app won’t appear in the Launchpad or anywhere else but it is installed and works in the background.
As the name itself indicates, the app automatically updates the Microsoft programs on your Mac device. Apart from bringing in new features, there are also several bug fixes and performance improvement updates that are automatically installed.
However, the app can take up an unnecessary amount of CPU usage, impacting the overall performance of the system. Also, sometimes it throws notices and notifications on the screen, making the experience a bit annoying.
But the good thing is that you can remove the tool. In this step-by-step guide, we will show you can quickly remove the Microsoft AutoUpdate tool from your macOS-powered device.
Remove Microsoft AutoUpdate from Mac
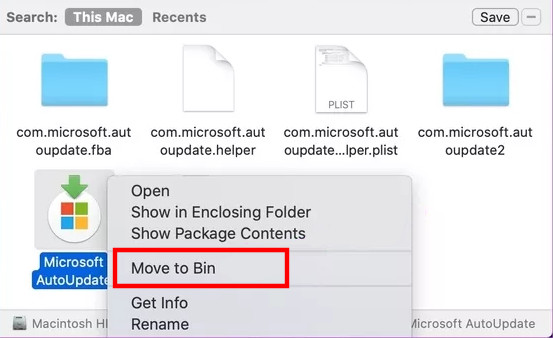
Step 1: Launch the Finder app on your macOS-powered device and type “microsoft autoupdate” in the search bar.
Step 2: From the search results, right-click on the Microsoft AutoUpdate program and then click on the ‘Move to Bin’ option.
Step 3: You will now be asked to enter your Mac’s password. Or if you have enabled Touch ID, you can authenticate the deletion process using your fingerprint.
To completely remove the AutoUpdate tool, we recommend deleting all of its associated files and folders.
This article is auto-generated by Algorithm Source: www.mobigyaan.com